Quattr Leads AEO, SEO, and Content Rankings on G2 Spring 2026.
Quattr Leads AEO, SEO, and Content Rankings on G2 Spring 2026.

Implementing htaccess redirects ensures website visitors find the correct pages when you update a domain name or URL structure. This step-by-step guide explores utilizing .htaccess files to manage your website's URLs and maintain seamless site navigation. Master these configuration basics to keep your audience on track and ensure your web presence remains authoritative and user-friendly.
7.
8.
10.
A .htaccess is the acronym for hypertext access. It is a directory-level configuration file supported by the Apache web server software that allows for decentralized management of web server configuration.
It helps control the deployment of web pages, configure security, and enable/disable additional server features. Understanding how to use .htaccess can improve your website's SEO, security, and usability.
The .htaccess file can assist in configuring password protection, URL redirects, and other everyday tasks like modifying your website's robots.txt file.
The storage of your .htaccess file is on the website's primary (or root) directory. The file applies to all the pages in that directory and its subdirectories. It contains a set of rules in the form of directives that the server interprets and applies.

The directives in the .htaccess file are very powerful, and one must use them carefully since faulty configurations can make the website inaccessible. The .htaccess file has various use cases. The most common use cases include:
1. Password Protection: The .htaccess file allows you to password-protect specific directories on your website. It is useful when you want to restrict access to sensitive information or web pages not meant for the public.
2. Redirects: With .htaccess, you can redirect users to different pages or URLs. It can be helpful when you are moving pages on your website or when you want to direct users to specific landing pages.
3. Enforcing Secure Connections: You can use .htaccess to force your website visitors to use HTTPS instead of HTTP. It ensures that all data transmitted between the server and the browser is encrypted.
4. Redirect www to non-www, and vice-versa: You can use .htaccess to redirect traffic from your domain with or without the "www" prefix. It is useful when you want to unify the URL structure of your website.
5. Prevent Hotlinking: Hotlinking can lead to high server loads and increased bandwidth usage. With .htaccess, you can block specific websites from hotlinking to your content.
6. Customizing 404 Error Pages: A 404 error page is displayed when a user tries to access a page on your website that doesn't exist. You can customize this page with .htaccess to provide users with more information and options.
7. Changing the Default Start Page: By default, web servers look for an index.html or index.php file to display as the start page of your website. With .htaccess, you can specify a different default page.
8. Blocking Specific IP Addresses: If you want to block access to your website from specific IP addresses, you can use .htaccess. It is helpful to prevent access from malicious bots or hackers.
When you are running a website, it is essential to ensure that you have strong security. One way that many website owners use to secure their websites is the use of a .htaccess file. It is a powerful method that can help you to protect your website from malicious attacks, content theft, and other vulnerabilities.
The .htaccess configuration file runs on Apache web servers to control different aspects of the server's behavior. It acts as a set of instructions that the server can refer to when serving web pages. These instructions can include setting specific folder permissions, redirecting users to different pages under certain conditions, and allowing you to password-protect certain areas of your website.
The .htaccess file creates a layer of security between the server and the public and can keep your website safe from threats.
Using a .htaccess file is common among web admins and is recommended to protect your website from malicious attacks. It provides an extra layer of security on top of what your web hosting provider may offer.
However, it is essential to note that .htaccess is only available for Apache web servers. If you're hosting your website on a different platform, you won't be able to use this security measure.
Other alternatives are available if you're hosting your website on a platform other than Apache or need more significant security measures. For example, you can use frameworks and libraries like Symfony, Laravel, CakePHP, and WordPress to secure your website. Alternatively, you can use tools like firewalls and intrusion detection systems to protect your website from malicious attacks.
Pro: Easier Security Setup
Using a .htaccess file is a great way to quickly and easily set up security features on your website. You can quickly and easily add passwords, redirects, and more to your site without writing code.
Con: Limited Security Measures
While a .htaccess file can add an extra layer of security to your website, it can only do so much. Advanced security measures like encryption, authentication, and access controls are unavailable through .htaccess files, so you may need to look at other options.
Complexity: .htaccess syntax can be challenging to understand, and minor errors can lead to unexpected behavior on your site, including unintended HTTP error codes, or make your website offline.
The .htaccess file is located in the root directory of your website. It may be hidden, so ensure you have enabled your FTP client to show hidden files. If you cannot find it, you can create a new .htaccess file and upload it to your root directory.
To deploy or create a new URL, you must enable your .htaccess file first. Enabling a .htaccess file on a server is typically done through the Apache server configuration settings.
Follow the steps to enable your .htaccess file here.
Once you have enabled the settings in the Apache configuration file, you can edit the settings in your .htaccess file. Several settings are available, depending on what you are trying to achieve.
Typical settings include redirects, password protection, disabling a directory listing, and custom error pages. You can also use .htaccess to set up URL rewrites and cache web pages. Steps to edit your .htaccess file:
1. To make changes to your .htaccess file, you must first download the existing file using your FTP client or your host's file access system, such as cPanel.
2. Once logged in, navigate to Files > File Manager and select Show Hidden Files. Navigate to the root of your site and click once on the .htaccess file that appears. To make changes, navigate to the top of the page and choose Edit.
3. Your .htaccess file may already include essential parameters. If your .htaccess file already has settings, replace them with the new code.
4. You can remove the existing file only if it is empty or you are confident it is safe.
After editing the .htaccess file, you must test it to ensure the settings are honored. You can quickly do this by visiting the page using the browser. If the page does not display as expected, you must ensure you have correctly edited the settings in your .htaccess file.
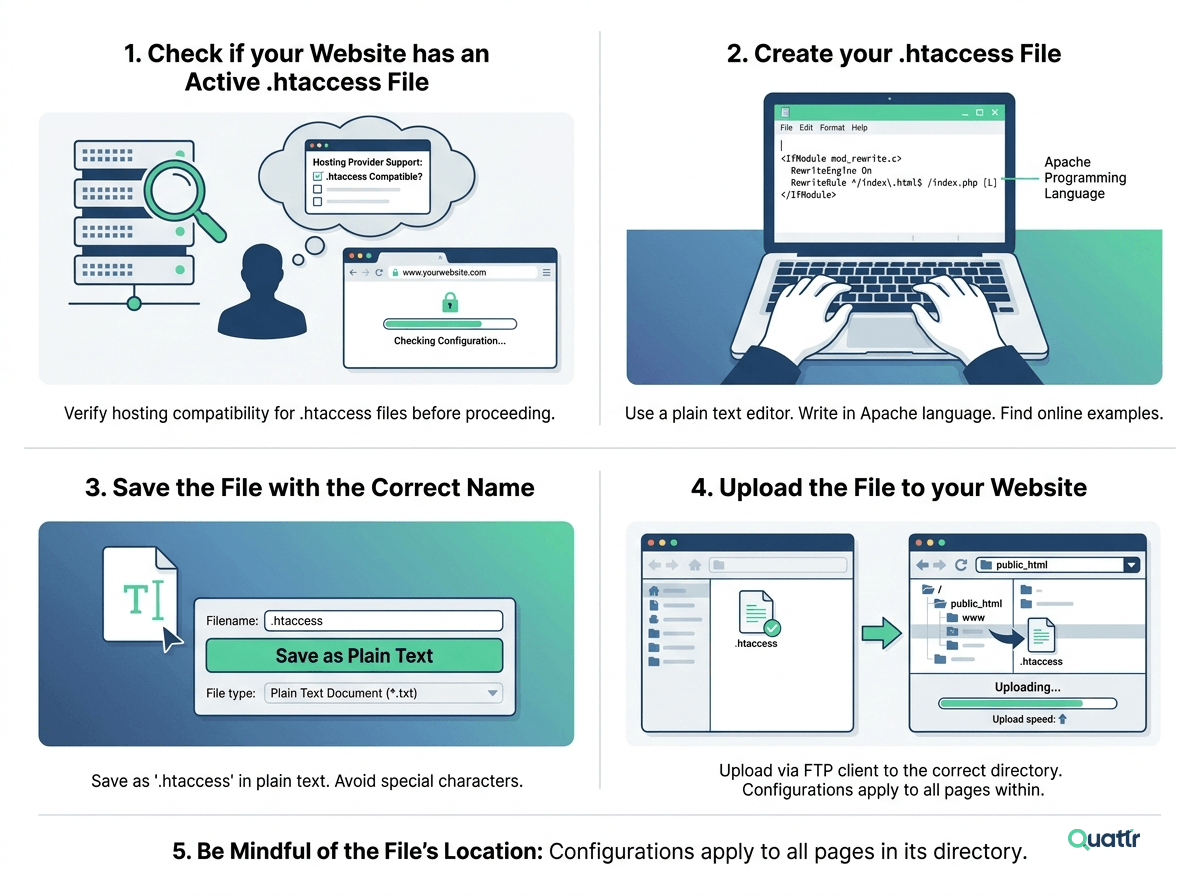
The .htaccess file is an essential component of your website's server configuration. Creating a .htaccess file can be daunting, especially for beginners. Here are some steps you can follow to create a .htaccess file:
1. Check if your Website has an Active .htaccess File: Before creating or editing a .htaccess file, you need to ensure that your website has an active .htaccess file. Check with your hosting provider if your website is compatible with .htaccess files.
2. Create your .htaccess File: Use a plain text editor to create or edit your .htaccess file. Remember that the file must be written in the Apache programming language. You can find examples of .htaccess configurations online to help you get started.
3. Save the File with the Correct Name: Save it with the extension ".htaccess" and ensure it is in plain text format. Avoid using any special characters or spaces in the file name.
4. Upload the File to your Website: Once you have created or edited your .htaccess file, upload it using an FTP client. Ensure you upload the file to the correct directory, as the configurations in the .htaccess file will apply to all pages.
5. Be Mindful of the File's Location: Remember that the .htaccess file's configurations will apply to all pages in its directory. So, be aware of where you place your .htaccess file, and ensure the configurations are appropriate for the pages in that directory.
The .htaccess file can have a significant impact on the SEO of a website. Using the .htaccess file can boost your website's technical SEO. Here are a few ways in which the .htaccess file affects SEO:
1. Redirects: One of the main functions of the .htaccess file is to set up redirects. Properly setting up redirects ensures that visitors are directed to the correct page and that the page's authority is maintained. If redirects are not set up correctly, it can result in a poor user experience and negatively impact SEO.
2. Canonicalization: The .htaccess file can assist in specifying the canonical version (original version) of a page when there are multiple versions of the same content. It helps to prevent duplicate content issues and ensures that search engines index the correct page.
3. Security: The .htaccess file can improve website security by preventing access to sensitive files or directories. It helps prevent hacking attempts and ensures that search engines do not penalize the website for security issues.
4. Page speed: The .htaccess file can be used to compress files, cache content, and enable browser caching, which can help to improve page speed. Faster page load times are essential for user experience and can positively impact SEO.
A URL redirect is a procedure that redirects users from an outdated or perhaps non-existent URL to another active and functioning URL.
Website owners frequently configure redirects for broken sites, have duplicate content, or have been relocated to new URLs. Users and search engines may then obtain the most relevant or current page. That is beneficial to the user experience and helps to avoid SEO issues.
You can check out our detailed blog on URL Redirects to learn more about URL redirections and their benefits.
Setting up redirects can be done in several ways, and we will discuss how to do it with a .htaccess file.
A .htaccess file lets you immediately change your website or server's settings. Setting up redirects with a .htaccess file is a simple process and can be used to create redirects manually or to create 'catch all' redirects for multiple pages or domains.
While there are various scenarios where you can use .htaccess files, it is necessary to remember what advantages and disadvantages you will face for using .htaccess files for redirects.
The advantages of using .htaccess files for redirects are as below:
1. Immediate Changes: The files activate on a request basis, so they will immediately begin to operate as soon as they are triggered. The global server configuration is activated when the server resets or reloads.
2. Minimal Access Required: By using .htaccess files, users with limited server access can change their access areas. It allows server alteration at the users' discretion without requiring global server access.
The disadvantages of using .htaccess files for redirects are as follows:
1. Security Issues: The .htaccess file allows users to change server settings, which can expose the server to security issues. You should ensure that the files have the correct access permissions. External access to .htaccess allows the files to be updated instantly, potentially compromising the web server.
2. Slows Down the Website: The .htaccess file might occasionally slow down the website due to the position of the page's gateway. It affects the pages in its directory and the directories underneath it.
Using .htaccess files, you can efficiently perform different redirects. Remember, changes to your .htaccess file must be taken with caution. One minor mistake can cause your site to stop functioning and take it offline.
Keep backups of all your .htaccess files and regularly test your redirects to ensure they work as intended.
Here are steps to perform different redirects using .htaccess files.
A 301 redirect is a status code informing search engines and visitors that a page has been relocated and sent to the right page.

To implement a 301 redirect using .htaccess, follow these steps:
1. Open the .htaccess file in your text editor
2. Add the following line to the file: Redirect 301 /old/old.html http://www.example.com/new.html
3. Replace the “/old/old.html” with the path to your old page and “http://www.example.com/new.html” with your new page.
The preceding will redirect your current website to a new site of your choice. It is helpful if you are moving your website to any domain.
4. Save the .htaccess file and upload it to your web server.
5. Visit the old page to confirm that the redirect is working.
To redirect a section of your website, add the following code to your .htaccess file:
Redirect 301/oldfolder
http://www.example.com/newfolder/
Once the code is in place and saved to the .htaccess file, upload the file to your server’s root directory.
A 302 redirect is a temporary update that leads users and search engines to the intended new address for a certain period before being withdrawn.

Use the following code in the .htaccess file to redirect your entire website to a different URL:
Redirect 302 / https://www.example.com/
The preceding will redirect your current website to a new site. This is useful if you are rebuilding your website and want to redirect users to a temporary location or landing page.
To redirect a section of your website, add the following code to your .htaccess file:
Redirect 302 /section https://www.example.com/newsection
The preceding code will redirect traffic from the "section" directory to the new "new section" directory. Use this if you are restructuring or reorganizing the navigation on your website and want to ensure that users still access the relevant content.
Finally, to redirect an individual page, you can use the following code:
Redirect 302 /old-page.html https://www.example.com/new-page.html
The code is valid when removing individual pages or updating the content but ensuring that users still arrive at the correct destination.
HTTP status code 303 informs a client that a resource is temporarily available at a different location and expressly advises the client to submit a GET request on the new URL, regardless of the original request type.

The process to set up a 303 redirect in .htaccess is similar to setting up a 301 redirect:
1. Open the .htaccess file in your website's root folder.
2. Insert the following code, adjusting the URLs to the desired ones.
Redirect 303 /old-url.html https://www.example.com/new-url.html
3. Save the changes and upload the .htaccess file to the server.
Canonical issues occur as a result of duplicating material on the website. When many URLs have the same or similar content, Google detects duplication and causes problems with URL crawling, and your link juice, also known as link equity, fades.
Canonical issues can negatively impact your SERP rankings and performance. Due to these problems, it is necessary to fix the canonical issues.
The most prevalent potential canonical URL issue is your website's www and non-www versions. You can resolve these canonical issues by manipulating the .htaccess file to execute a 301 redirect. You must open the .htaccess file and write the following code:
RewriteEngine On
RewriteCond %{HTTP_HOST} !^www.example.com$ [NC] RewriteRule ^(.*)$ http://www.example.com/$1 [L,R=301]
Once the code is added, save your .htaccess file and upload it to the server. After uploading the file, remember to modify other files, like the robots.txt file and sitemaps, to eliminate faulty or broken links from the website.
Before learning the steps to create a customized 404 page, let us first understand what a 404 error page is and how it benefits SEO. A 404 page appears when a page on a live website either does not exist or has a changed URL. Your server will show a separate page if the website is unavailable or inoperable. Learn more about the 404 error code here.
The steps to create custom 404 pages in your .htaccess file are easy. Using FTP, you may make it with a text editor and upload it to your site. Keep in mind that the filename must be “.htaccess.”
Replace new404.html with the right new error page name in the file and add the following line:
ErrorDocument 404 /new404.html
Save the .htaccess file and exit. Remember that Apache searches for the 404 page in the site's server root. If you create the new error page in a deeper subdirectory, you must include that in the line, which looks like this:
ErrorDocument 404 /error_pages/new404.html
The above steps will help you display the customized message to your users if the page is unavailable.
Errors are common in .htaccess files because they are precise and sensitive to syntax. Even the slightest typo can cause an error, which can be challenging to debug.
Additionally, many .htaccess files include complex rewrite rules, which can cause errors if not set up correctly. Lastly, some hosting providers have strict rules regarding the formatting and contents of .htaccess files, and any deviation from these requirements can lead to errors.
There are a few solutions for troubleshooting .htaccess files for redirects. Depending on the problem, you may employ a mix of the options listed below to identify & resolve the issue.
1. Check the syntax of your .htaccess file. Ensure all directives are correctly formatted and there are no typos or omissions.
2. Ensure that mod_rewrite is enabled in your Apache configuration to execute the rules in your .htaccess file.
3. Check that the RewriteBase is correct in your .htaccess file.
4. Check the RewriteRule directives and ensure they are correct and designed to match your intended redirects.
5. If using a regular expression with a caret (^) in the beginning, ensure that the RewriteEngine has the 'On' setting.
6. Test your .htaccess file to ensure your redirects are working correctly. Use a tool to check that only expected redirects are displaying.
7. Look for third-party modules (such as ModSecurity) that might interfere with your .htaccess file.
8. Check the error logs for your web server to look for any errors related to your .htaccess file.
9. Ensure that the .htaccess file is in the correct location on your server. It should be located in the root directory of your website.
In conclusion, URL redirects are important for SEO as they guide users and search engines to the correct pages while maintaining a smooth experience. Using .htaccess files gives flexibility, but incorrect setup can harm your site’s performance and accessibility.
With Quattr, you can easily identify redirect issues, monitor performance, and optimize your SEO strategy effectively.
The .htaccess file is a configuration file utilized by Apache web servers to control various settings, including redirects, authentication, content types, security, and optimization. It contains user access to specific directories and password-protect guides to enable logging, prevent hotlinking, and more.
A redirect is a client-side request to route the web browser to another URL. It implies that the server will update the URL in your browser to the new URL. In contrast, a rewrite is a server-side URL rewriting that occurs before Internet Information Services (IIS) fully processes it.
Yes, redirects can be beneficial for SEO. Redirects can help users and search engine crawlers find the correct page if the URL has changed, preventing errors. Additionally, redirects can help preserve authority, link juice, and help make the most of a domain change.
An .htaccess file is a special configuration file used on Apache servers to control how your website behaves. It lets you make changes like redirecting your site to HTTPS or adding “www” to your URLs. You can also set up rules to show different content to users based on conditions, such as directing visitors to one page while you see another.
“.htaccess” is not a file extension like .css or .js, it is the complete filename. The dot at the beginning indicates that it is a hidden file, so it may not be visible by default in some file managers or FTP tools.

Quattr is an AI-native Search Visibility Platform founded in Palo Alto, California, built for mid-market and enterprise brands competing in the age of generative search. Recently recognized across G2’s Spring 2026 reports with #1 rankings in AEO Results, Usability, and Relationship, Quattr helps brands win visibility across traditional search and AI-generated answer surfaces.
Quattr’s AI agent, GIGA, evaluates content the way AI systems do, identifying gaps across structure, authority, internal linking, and discoverability to surface the highest-impact fixes. With capabilities like autonomous internal linking, E-E-A-T intelligence, and the new GIGA Landing Page Generator for keyword-matched, AI-search-ready pages, Quattr helps teams move from diagnosis to deployed changes without manual bottlenecks.


Try our growth engine for free with a test drive.
Our AI SEO platform will analyze your website and provide you with insights on the top opportunities for your site across content, experience, and discoverability metrics that are actionable and personalized to your brand.

.svg)
.svg)


